Log in to your account at https://clients.webage.net to access your email user name and password details.
Auto Discover Settings
Example is for Windows 10.
- On the task bar, click Search, search for Outlook
- Enter your email address
- Choose IMAP.
- When prompted, enter Password
- Auto-configuration runs
Manual Settings
- On the task bar, click Search, search for Outlook
- In Outlook, choose File > Info > Add Account
- Enter your email address and under Advanced Options, check "Let me set up my account manually". Click Connect.
- Choose IMAP
- For incoming mail:
- Server: mail.mydomain.com (replacing mydomain.com with your own domain name)
- Port: 993
- Encryption method: SSL/TLS
- Require logon using Secure Password Authentication (SPA): no - do not check this box
- For outgoing mail:
- Server: mail.mydomain.com (replacing mydomain.com with your own domain name)
- Port: 465
- Encryption method: SSL/TLS
- Require logon using Secure Password Authentication (SPA): no - do not check this box
- Click Next.
- Enter Password, and click Connect
- Configuration runs; click Done when complete.
Note: outgoing mail requires authentication. This should be set automatically during the above setup process, but to verify this:
- Go to File > Info > Account Information > Account Settings > Server Settings > Outgoing Mail.
- Ensure the box beside "My outgoing (SMTP) server requires authentication" is checked.
- Ensure "Use same settings as my incoming mail server" is selected.
- Click Next to finish this check.
Example of correctly configured IMAP email in Outlook, Office 365
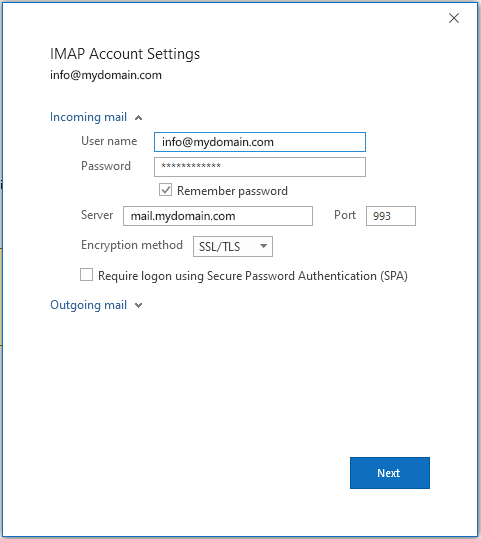
Incoming mail
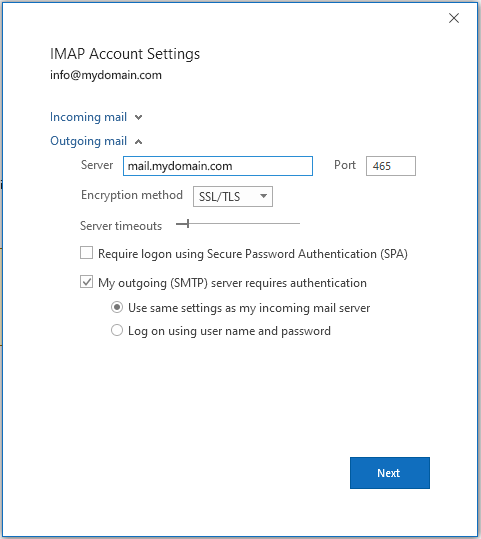
Outgoing mail
